You know that sound. The one that wakes you up at 2 AM. That faint, maddening trickle coming from the bathroom that won’t stop no matter how many times you jiggle the handle.
A running toilet wastes up to 200 gallons of water per day. That’s roughly $50 extra on your monthly water bill, just trickling away while you sleep. The good news? Nine times out of ten, the fix takes less than 10 minutes and costs exactly nothing.
The culprit is almost always the toilet float. And adjusting it is one of the easiest DIY repairs you’ll ever do.
What Does a Toilet Float Actually Do?
Before you start tinkering, it helps to understand what’s happening inside your tank.
When you flush, water rushes out of the tank and into the bowl. As the tank empties, the float drops. This drop signals the fill valve to open and let fresh water in. As water fills the tank, the float rises. Once it reaches a certain height, it tells the fill valve to shut off.
Simple, right? The problem is when that shutoff point is wrong.
Set the float too high, and water keeps flowing over the overflow tube—that’s your running toilet. Set it too low, and you get weak flushes that can’t clear the bowl properly. Either way, you’re wasting water or dealing with a toilet that doesn’t do its job.
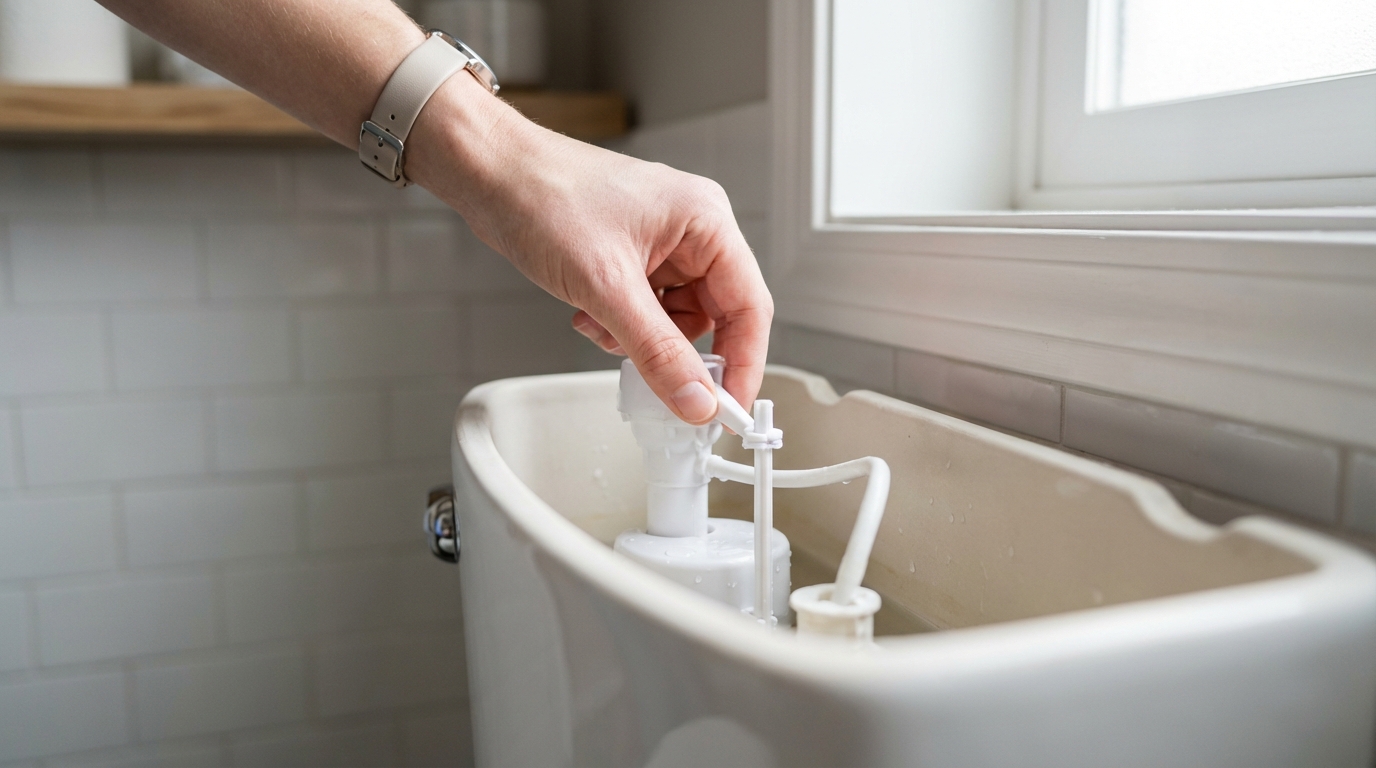
Identify Your Float Type First
Pop the lid off your toilet tank and take a look inside. You’ll see one of two main float designs.
Ball Float (Ballcock Style)
If your toilet has a large plastic or rubber ball attached to a horizontal metal arm, you’ve got a ball float. This is the old-school design—been around since your grandparents were kids. The ball floats on the water surface, and the arm connects to the fill valve on the side of the tank.
Ball floats are common in toilets manufactured before 1999, though some budget models still use them today.
Cup Float (Cylinder Style)
Most modern toilets use a cup float instead. This looks like a small plastic cylinder that slides up and down on a vertical shaft attached to the fill valve. No ball, no arm—just a cup that rises with the water level.
Cup floats became standard in the early 2000s because they’re more compact and reliable. If you have a Fluidmaster 400A (the most popular fill valve in North America), you have a cup float.
Internal Float Valve
Some newer high-efficiency toilets hide the float mechanism entirely inside the fill valve body. These require different adjustment methods—check your toilet’s manual if you don’t see an obvious float.
Tools You’ll Need
Here’s everything required for this job:
- Flathead screwdriver (for most ball floats)
- Adjustable pliers (optional, for stubborn adjustment screws)
- Towel or rag (for drips)
- Flashlight (tank interiors are dark)
That’s it. No special plumbing tools, no trips to the hardware store.
How to Adjust a Ball Float
Ball floats have two adjustment methods. Try the screw first—it’s cleaner.
Method 1: The Adjustment Screw
Turn off the water supply. Find the shutoff valve behind your toilet (usually on the wall or floor). Turn it clockwise until it stops.
Flush and hold. This empties the tank so you can see what you’re doing.
Locate the adjustment screw. Look where the float arm connects to the fill valve. You’ll see a screw—sometimes it’s a Phillips head, sometimes flathead.
Turn the screw to adjust. Here’s where most guides get it backwards, so pay attention:
- Turn clockwise to lower the water level (this lowers the float’s shutoff point)
- Turn counterclockwise to raise the water level
Turn the water back on. Let the tank fill and check the water level. It should stop 1/2 to 1 inch below the top of the overflow tube.
Test with a flush. Make sure the bowl clears properly and the tank stops filling at the right point.
Method 2: Bending the Float Arm
Older ball floats don’t have adjustment screws. For these, you physically bend the arm.
This feels wrong—like you’re about to break something. You’re not. These arms are designed to be bent.
To lower the water level: Grip the arm near the middle and bend it gently downward. A 1/4-inch bend at the center translates to about a 1-inch change in water level.
To raise the water level: Bend the arm gently upward.
Go slow. Small adjustments only. I’ve seen people get aggressive and crack the arm right off the valve. Not the end of the world (replacement valves are $15), but it’s an easy problem to avoid.
How to Adjust a Cup Float
Cup floats are even easier to adjust because everything happens on one vertical shaft.
Turn off the water supply and flush to empty the tank.
Find the adjustment mechanism. Cup floats have one of two systems:
- Adjustment screw/dial at the top of the fill valve
- Pinch clip that lets you slide the float up or down
For screw-type adjustments:
- Look for a large screw or dial on top of the fill valve
- Turn counterclockwise to raise water level
- Turn clockwise to lower water level
- The Fluidmaster 400 series has a ridged plastic dial you can turn with your fingers—no screwdriver needed
For clip-type adjustments:
- Locate the spring clip on the float cup
- Squeeze the clip with your thumb and forefinger
- While squeezing, slide the float up (for higher water) or down (for lower water)
- Release the clip to lock the new position
Turn the water on and test. Same as before—water should stop 1/2 to 1 inch below the overflow tube.
The Most Common Mistake
I see this constantly: people adjust their cup float and nothing changes. The reason? They’re turning the height adjustment instead of the water level adjustment.
Cup-style fill valves often have TWO adjustable parts:
- Height adjustment (changes how tall the whole valve is—only matters during installation)
- Water level adjustment (the one you actually want)
On a Fluidmaster 400A, the height adjustment is a twist-lock at the base. The water level adjustment is the dial or screw at the very top. Don’t confuse them.
Finding the Right Water Level
So where exactly should the water be?
The golden rule: 1/2 to 1 inch below the top of the overflow tube.
Look inside your tank for a marked line. Many manufacturers stamp “WATER LINE” or “MAX WATER LEVEL” on the tank wall or the overflow tube itself. If your toilet has this mark, use it.
If there’s no mark, measure down from the overflow tube:
- Minimum: 1/2 inch below (any higher and you risk overflow)
- Ideal: 3/4 inch below (safest margin)
- Maximum: 1 inch below (any lower and flushes weaken)
Pro tip: After adjusting, add a few drops of food coloring to the tank. Wait 15 minutes without flushing. If color appears in the bowl, water is still leaking past the flapper—that’s a different problem.
When the Float Adjustment Doesn’t Fix It
Adjusted the float perfectly but the toilet still runs? The problem might be elsewhere.
Check the Flapper
Lift your flapper and look at the rubber seal. If it’s warped, cracked, or has mineral buildup around the edges, it can’t seal properly. Water seeps past it constantly, triggering the fill valve to top off the tank.
Flappers wear out every 3-5 years. They cost $5-10 and swap out in two minutes.
Check the Fill Valve
If your fill valve is more than 7 years old and the float adjustment doesn’t stick, the valve itself may be worn. Signs include:
- Hissing sounds from the valve
- Water level changing on its own
- Valve that won’t shut off completely
Replacement fill valves run $10-20 and take about 20 minutes to install. The Korky 528 and Fluidmaster 400A are both solid choices.
Check the Overflow Tube Height
Here’s one that trips people up: if your overflow tube is too short (or was cut during a past repair), the water level might be physically impossible to get right. The tube should extend at least 1 inch above your target water line.
Signs Your Float Needs Attention
Not sure if your float is the problem? Watch for these:
Running toilet syndrome: You hear water flowing into the tank when nobody’s used it. Sometimes constant, sometimes every few minutes (called “phantom flushing”).
Weak or incomplete flushes: The bowl doesn’t clear on the first try. This often means the tank water level is too low.
Tank takes forever to refill: If it takes more than 60-90 seconds to refill after a flush, the water level might be set too high (the valve has to fill to a higher point).
Visible water flow into overflow tube: Pop the lid off while the tank is full. If you see water streaming into the overflow tube, the float is definitely set too high.
Maintenance Tips to Prevent Future Issues
A few minutes of maintenance now saves headaches later.
Check the float twice a year. Pop the lid, look at the water level, make sure nothing’s corroded or mineral-crusted. Takes 30 seconds.
Avoid drop-in tank cleaners. Those blue tablets that turn your tank water teal? They contain chlorine and chemicals that destroy rubber and plastic components. Fluidmaster specifically warns against them in their warranty terms.
Clean mineral deposits annually. In hard water areas, calcium buildup can prevent the float from moving freely. A toothbrush and white vinegar handle most deposits.
Replace the flapper proactively. Don’t wait for it to fail. Swap it out every 4-5 years as preventive maintenance.
When to Call a Professional
Most float adjustments are true DIY territory. But call a plumber if:
- You’ve adjusted everything and the toilet still runs
- The shutoff valve behind the toilet won’t turn or is leaking
- You see cracks in the tank or bowl
- The toilet rocks on the floor (indicates a failed wax ring—a separate problem)
- You’re uncomfortable working with plumbing
A running toilet shouldn’t cost more than $75-150 for a professional repair. If someone quotes you more for a simple fill valve replacement, get a second opinion.
Key Takeaways
Here’s the short version:
- Ball floats: Turn the adjustment screw clockwise to lower water level, counterclockwise to raise it. Or gently bend the arm.
- Cup floats: Turn the top dial/screw or slide the pinch clip to adjust height.
- Target water level: 1/2 to 1 inch below the overflow tube.
- Still running after adjustment? Check the flapper and fill valve condition.
- Prevention: Skip the drop-in cleaners and check your tank twice a year.
That trickling sound at 2 AM? You’ve got this. Turn off the water, pop the lid, make a small adjustment, and test. The whole fix takes less time than reading this article did.
And your water bill will thank you.